Thursday, April 18, 2019

How to Use TestNG Framework for Creating Selenium Scripts | Selenium Test Case with TestNG Framework | TestNG Tutorials

In this tutorial, we will learn how to write a test case using the TestNG framework and generate TestNG report.


Topics to be covered?


  1. Use of @BeforeMethod, @Test and @AfterMethod annotation for writing a test case.
  2. Use of 'Priority' keyword.
  3. Generate TestNG report to analyze the result of test case execution.
Note - If are not aware of TestNG and its annotations, you can follow the link - TestNG Introduction


Let us take the example of Facebook application. We have been told to automate two scenarios - 
  1. Open the Facebook application and Print the Login Page title on the Console
  2. Open the Facebook application and Enter Username and Password.
Note  - After validating every scenario the browser page should be closed.

If you observe the above two scenarios, you must be noticing that the first thing which is common is to Open the application and the last thing is to close the browser. We can say these two things are our pre-requisites which must be handled before validating our test scenarios.

Below we will see how to handle such scenarios with the help of TestNG annotations:

  • @BeforeMethod - Method under this annotation will execute before the execution of each @test annotation.
Note -This annotation basically covers the initial pre-requisite part of a test case. In our case Open the application.

  • @Test - Defines a particular functionality of the application. We write our test case under the method of this annotation.
Note - In our case, the above scenario will be covered under this annotation.

  • @AfterMethod - Method under this annotation will execute after the execution of each @test annotation.
Note - It will cover the action that will be performed after the execution of every test case. In our case, closing the Browser Page.


I hope you have understood under which situation we need to use the above three annotations.

Now we will see how to automate the above two scenarios with the help of a program.

One more important thing to note is that we don't need to use the main() method if you are using TestNG annotations. The call of the main() method is handled by the annotations of the TestNg automatically.


 package com.testng;  
   
 import java.util.concurrent.TimeUnit;  
   
 import org.openqa.selenium.By;  
 import org.openqa.selenium.WebDriver;  
 import org.openqa.selenium.chrome.ChromeDriver;  
 import org.testng.annotations.AfterMethod;  
 import org.testng.annotations.BeforeMethod;  
 import org.testng.annotations.Test;  
   
 public class FirstTestNGScript {  
        
      WebDriver driver;// declaring driver as public.  
        
      @BeforeMethod  
      public void LaunchApplication()  
      {  
           System.setProperty("webdriver.chrome.driver", "F:\\software\\chromedriver_win32\\chromedriver.exe");  
           driver = new ChromeDriver();  
           driver.manage().window().maximize();  
           driver.manage().timeouts().implicitlyWait(60, TimeUnit.SECONDS);  
           driver.get("https://www.facebook.com/");//launching the application       
      }  
        
        
      //Test case 1  
      @Test  
      public void printLoginPageTitle()  
      {  
           String Loginpagetitle = driver.getCurrentUrl();  
           System.out.println(Loginpagetitle);//Printing the title on the console  
      }  
        
      //Test Case 2  
      @Test  
      public void enterUsernamePassword()  
      {  
           //Enter Username and Password  
           driver.findElement(By.xpath("//input[@id='email']")).sendKeys("xyz@gmail.com");  
           driver.findElement(By.xpath("//input[@id='pass']")).sendKeys("**********");  
      }  


      @AfterMethod  
      public void closeBrowserPage()  
      {  
           driver.close();//Closing the browser page  
      }  


 }  


Order of above test cases execution:

  1. FB application will be launched.
  2. 2nd Test Case will be executed.
  3. Close of browser.
  4. Again FB application will be launched.
  5. 1st Test Case will be executed.
  6. Close of browser.


You must have thinking that why the 2nd test will be executed before the 1st one?


  • The answer is that TestNG follows the execution order of test cases based on the name of the methods written under @Test annotations.
  • It follows the alphabetical order of the methods name.
  • In our case, 'e' in enterUsernamePassword() method comes before 'p' in printLoginPageTitle() method based on alphabetical order.
  • In case, the first letter is the same in both the methods then the second letter of both the methods will be taken into consideration and so on.

I hope your doubt must be cleared.


What is the workaround, if we want to execute the first test case before the second one?

  • Well TestNG provides one keyword - 'Priority'
  • It is used as @Test(priority=0).
  • If we set the priority of a test case as 0, it means the test case will be executed first.
  • Priority keyword follows index = 0,1,2,3....

Now We will use this concept in our previous program to change the execution order.


 package com.testng;  
   
 import java.util.concurrent.TimeUnit;  
   
 import org.openqa.selenium.By;  
 import org.openqa.selenium.WebDriver;  
 import org.openqa.selenium.chrome.ChromeDriver;  
 import org.testng.annotations.AfterMethod;  
 import org.testng.annotations.BeforeMethod;  
 import org.testng.annotations.Test;  
   
 public class FirstTestNGScript {  
        
      WebDriver driver;// declaring driver as public.  
        
      @BeforeMethod  
      public void LaunchApplication()  
      {  
           System.setProperty("webdriver.chrome.driver", "F:\\software\\chromedriver_win32\\chromedriver.exe");  
           driver = new ChromeDriver();  
           driver.manage().window().maximize();  
           driver.manage().timeouts().implicitlyWait(60, TimeUnit.SECONDS);  
           driver.get("https://www.facebook.com/");//launching the application       
      }  
        
        
      //Test case 1  
      @Test(priority=2)  
      public void printLoginPageTitle()  
      {  
           String Loginpagetitle = driver.getCurrentUrl();  
           System.out.println(Loginpagetitle);//Printing the title on the console  
      }  
        
      //Test Case 2  
      @Test(priority=1)  
      public void enterUsernamePassword()  
      {  
           //Enter Username and Password  
           driver.findElement(By.xpath("//input[@id='email']")).sendKeys("xyz@gmail.com");  
           driver.findElement(By.xpath("//input[@id='pass']")).sendKeys("**********");  
      }  


      @AfterMethod  
      public void closeBrowserPage()  
      {  
           driver.close();//Closing the browser page  
      }  


 }  


Order of above test cases execution:

  1. FB application will be launched.
  2. 1nd Test Case will be executed.
  3. Close of browser.
  4. Again FB application will be launched.
  5. 2st Test Case will be executed.
  6. Close of browser.

Now we will learn how to open TestNG report:

  • First, after the execution of the script, we can see the report on the Eclipse console.


  • Second, We can open the customized HTML TestNG report as explained below - 
--> Refresh the TestNG Project.
--> One 'test-output' folder will be generated.
--> Expand the folder.
--> Locate one 'index.html' file.


--> Open the file. This is the customized TestNG  HTML report.


That's all guys!!! Do comment and ask your doubts if you have any. Thanks.

Sunday, March 10, 2019

TestNG Tutorial | TestNG Framework with Selenium : How to Install TestNG in Eclipse IDE for Selenium WebDriver

In this tutorial, We will learn how to install and configure TestNG with Eclipse to use TestNG framework in automating scripts using Selenium WebDriver.


Topics to be covered?
  1. Install TestNG in Eclipse IDE.
  2. Configure TestNg Library with the Selenium Project in Eclipse.

In case you are not aware of TestNG, follow the link - TestNG Introduction


Install TestNG in Eclipse IDE

Note - Most of the times TestNG is pre-installed with the Eclipse IDE. So you don't need to do this step.

How to Verify?

Steps: Right click on the Project -> Click on the Build Path -> Click on Configure Build path -> Click on 'Add Library' -> Verify 'TestNG' option as shown in the image below.


If the 'TestNG' option is available as shown in the image above, it means TestNG is pre-installed in the Eclipse IDE.


If Not, then??

Follow below steps to Install TestNG in Eclipse IDE.

  1. Launch Eclipse.
  2. On the menu bar, click Help.
  3. Choose the "Eclipse Marketplace..." option.


     4. In the Eclipse Marketplace dialog box, type TestNG in the search box and press the search button( magnifying glass) or press Enter key.


   5. Click Install


  6. A new window for feature selection will open, Do not change anything and Click on confirm button.


  7. Click Next again on the succeeding dialog box until you reach the License Agreement dialog.
  8. Click "I accept the terms of the license agreement" then click Finish.


  9. If you encounter a Security warning, just click OK


 10. When Eclipse prompts you for a restart, just click Yes.


  11. After the restart, verify if TestNG was indeed successfully installed. Click Window > Preferences and see if TestNG is included on the Preferences list.


Thus, TestNG is installed in Eclipse IDE.


Configure TestNg Library with the Selenium Project in Eclipse

After Installation of TestNG in Eclipse IDE, We need to configure TestNG Library in our Project(Created In Eclipse) to use the annotations and various useful features provided by TestNG framework.

Click on the below Video URL to configure TestNG Library -

Configure TestNG Library in Eclipse IDE


This is all about how to install and configure TestNg in Eclipse IDE.
In this next tutorial, we will see how to run a selenium test case using TestNG Framework.


Saturday, March 9, 2019

TestNG Tutorial | TestNG Framework with Selenium : Advantages, Annotations | TestNG VS JUnit

In this tutorial, I am going to cover the Introduction to TestNG and its uses in Selenium.


Topics to be covered?
  • What is TestNG?
  • Advantages of TestNG.
  • Annotations of TestNG.
  • Difference between JUnit and TestNG.


TestNG is a testing framework which is used to design and maintain test scripts efficiently and generate test execution results in the form of HTML report. It covers a wide range of testing from Unit testing to end-to-end testing.


Advantages - 

  1. It provides effective HTML report that explains test execution result.
  2. It allows parallel execution of test cases.
  3. It supports parameterization using @parameters annotation.
  4. It provides flexibility to prioritize test cases.
  5. It provides flexibility to ignore the execution of test cases.
  6. It provides assertions to examine the expected and actual outcome.
  7. It supports grouping of test cases.
  8. It supports Data Driven Testing using @DataProvider annotation.


Annotations in TestNG – 

  1. @BeforeSuite – Method under this annotation will execute before the execution of all the tests in the suite.
  2. @AfterSuite – Method under this annotation will execute after the execution of all the tests in the suite.
  3. @BeforeClass – Method under this annotation will execute before the execution of first @test annotation.
  4. @AfterClass – Method under this annotation will execute after the execution of all @test annotation.
  5. @BeforeMethod – Method under this annotation will execute before the execution of each @test annotation.
  6. @AfterMethod – Method under this annotation will execute after the execution of each @test annotation.
  7. @Test – Defines a particular functionality of the application.
  8. @BeforeTest – Method under this annotation will execute before the execution of first @test annotation.
  9. @AfterClass – Method under this annotation will execute after the execution of all @test annotation.

JUnit

It is also a testing framework like TestNG. However, TestNG has some more useful features compared to JUnit. So we can say TestNG is the enhanced version of JUnit.


Similarities between JUnit and TestNG

  • Annotations - Both have similar annotations(@Test, @BeforeClass, @AfterClass), Almost similar annotations(TestNG has @BeforeMethod and @AfterMethod, similarly JUnit has @Before and @After).
  • Annotation to set TimeOut - Both have @Test(timeOut = 1000) in miliseconds.
  • Annotation to Ignore Test - TestNG has @Test(enabled=true) and JUnit has @Ignore.
  • Annotation for Exception - TestNG has @Test(expectedExpecptions=ExceptionName.class) and JUnit has @Test(expected=ExceptionName.class)

Dis-similarities between JUnit and TestNG

  • Annotations - Unlike TestNG, JUnit does not provide @BeforeSuite, @AfterSuite, @BeforeTest and @AfterTest annotations.
  • TestNG provides Grouping of test cases whereas JUnit does not.
  • TestNG provides parallel execution of test cases whereas JUnit does not.
  • Achieving Parametrization in JUnit is more complex than that of TestNG.
  • TestNG provides Dependency of a method on other methods functionality of test cases whereas JUnit does not.


Sunday, January 20, 2019

How To Handle Hidden Elements in Selenium WebDriver | Working with hidden controls in Selenium

In this tutorial, we will learn how to handle Hidden Elements on the web-pages using Selenium WebDriver.


Handle Hidden Elements


Hidden elements are the elements which are not displayed on the Web-Pages, however, it is available in the HTML DOM structure.

Elements are hidden on the web-pages due to below-mentioned reasons - 
  • They have a CSS display value of none.
          style=”display: none;”
  • They are form elements with type="hidden"
  • Their width and height are explicitly set to 0.
  • An ancestor element is hidden, so the element is not shown on the page.

Issue - Selenium does not allow to interact with an element which is hidden on the web-page and if we try to do so, then it will throw ''Element Not Visible Exception".

Solution - Selenium provides one feature called 'Javascript Executor' to handle such scenario.


Note - I will take 'https://learn.letskodeit.com/p/practice' website to explain the above concept.

If you open the above link and scroll down a bit, then on the right side you will get one section as displayed in the below image.


 - There are two buttons - 'Hide' and 'Show'
 - Currently, the 'Hide/Show Example' text box is displayed.
 - Once you click on the 'Hide' button, the text box will be hidden.
 - Again you click on the 'Show' button, the text box will be displayed.


Scenario 1 - Write a program to enter text in the text box which is hidden on the web-page.  

Case 1: I will hide the text box and then simply try to enter text 'text123' in the text box. "Element Not Visible Exception" will be thrown. See the below program -


 package com.sessions;  
   
 import org.openqa.selenium.By;  
 import org.openqa.selenium.JavascriptExecutor;  
 import org.openqa.selenium.WebDriver;  
 import org.openqa.selenium.chrome.ChromeDriver;  
   
 public class HiddenElementTest {  
   
      public static void main(String[] args) throws Exception {  
     System.setProperty("webdriver.chrome.driver", "F:\\software\\chromedriver_win32\\chromedriver.exe");  
             
           WebDriver driver = new ChromeDriver();  
             
           driver.get("https://learn.letskodeit.com/p/practice");  
             
           driver.manage().window().maximize();  
             
           //Clicking on the Hide button  
           driver.findElement(By.xpath("//input[@id='hide-textbox']")).click();  
                       
           driver.findElement(By.xpath("//input[@id='displayed-text']")).sendKeys("text123");;  


      }  
   
 }  


Output -


Case 2: This time I will handle Scenario 1 using Javascript Executor. See the below program -


 package com.sessions;  
   
 import org.openqa.selenium.By;  
 import org.openqa.selenium.JavascriptExecutor;  
 import org.openqa.selenium.WebDriver;  
 import org.openqa.selenium.chrome.ChromeDriver;  
   
 public class HiddenElementTest {  
   
      public static void main(String[] args) throws Exception {  
     System.setProperty("webdriver.chrome.driver", "F:\\software\\chromedriver_win32\\chromedriver.exe");  
             
           WebDriver driver = new ChromeDriver();  
             
           driver.get("https://learn.letskodeit.com/p/practice");  
             
           driver.manage().window().maximize();  
             
           //Clicking on the Hide button  
           driver.findElement(By.xpath("//input[@id='hide-textbox']")).click();  
                       
           JavascriptExecutor js = (JavascriptExecutor)driver;  
             
           // Identifying the element using ID attribute and Entering the value in the text box  
     js.executeScript("document.getElementById('displayed-text').value='text123'");  
             
             
           }  
   
 }  


Explanation -

  • JavascriptExecutor - It is an interface provided by Selenium WebDriver to execute Javascript commands in the Selenium Script.
  • getElementById() - It is a Javascript method that is used to locate an element on the web-page using ID attribute of that element.
  • executeScript() - It is a method of JavascriptExecutor interface to execute the javascript commands in the Selenium Script.

Note - Since the text box is hidden, so you won't be able to see the text entered in the text box. Run the program and you will find that it runs successfully without any exception. Now,  If you click on the 'Show' button then you will see the text is entered in the box.


That's all guys!!! Do comment and post your doubts related to Selenium!!!


Sunday, December 30, 2018

How To Select Date From Calendar in Selenium WebDriver using Jquery | Handle Date Time Picker Using Selenium WebDriver

In this tutorial, I am going to explain how to select a date from a calendar of any websites.


Handle Date Time Picker In Selenium


how-to-handle-calender-using-selenium-webdriver


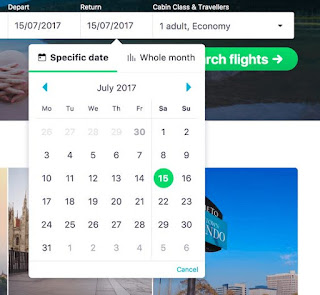
We often observe Date Time Picker fields on the websites mostly on E-Commerce and Travel Booking websites. Different websites use the Date Time Picker field/Calendar having different UI, but the functionality is the same. So in this tutorial, we will learn how to handle Date Time Picker field/Calendar using Selenium WebDriver.

There may be different ways to handle such a scenario. But here I will explain just one way that will cover any type of Date Time Picker field of any websites. I will use just one line of code that will handle the scenario. I will use the concept of JavaScript Executor(JQuery).

We will take 'Yatra' website to demonstrate the scenario.


 package com.sessions;  
   
 import org.openqa.selenium.JavascriptExecutor;  
 import org.openqa.selenium.WebDriver;  
 import org.openqa.selenium.chrome.ChromeDriver;  
   
   
 public class CalendarTest {  
   
      public static void main(String[] args) {  
             
           System.setProperty("webdriver.chrome.driver", "F:\\software\\chromedriver_win32\\chromedriver.exe");  
             
           WebDriver driver = new ChromeDriver();  
             
           driver.get("http://www.yatra.com/");  
             
           driver.manage().window().maximize();  
             
           //Typecating driver as a JavascriptExecutor and assigning it to the variable of JavascriptExecutor  
           JavascriptExecutor js = (JavascriptExecutor )driver;  
             
           //Putting date to the the selected date picker.  
           js.executeScript("document.getElementById('BE_flight_origin_date').value='03/10'");  
   
      }  
   
 }  


Explanation

  • Javascript Executor is an Interface provided by Selenium WebDriver which is used to run Javascript commands from Selenium script.
  • This Interface provides a method executeScript() - to run the Javascript commands.
  • We need to import one package called org.openqa.selenium.JavascriptExecutor.
  • Since the driver can execute only selenium commands so we need to typecast driver as a JavascriptExecutor so that Javascript commands can be run from Selenium script.  
  • document.getElementById('BE_flight_origin_date').value='03/10'
Here, getElementById('value of the Id attribute') is used to locate element (date picker field) on the webpage using ID attribute and then we are setting date value to the field. We can inspect and get the Id attribute as we do in Selenium.

In case you do not know how to inspect element, follow the link - Inspect Element In Selenium


Note - Before setting the date value, first verify in which format the field is accepting the date value. Based on the format provide the value in the script. In our case format is - '03/10'.


As I said just one line of code and everything is done!!!


General Steps
  1. Define JavascriptExecutor interface variable and typecast the driver.
  2. execute the command by locating the date picker field using its Id attribute and set the value based on the acceptable date format.


That's all guys!!! Do comment and post your doubts related to Selenium!!!


Saturday, December 22, 2018

Top 10 Selenium Interview Questions And Answers - Part 1


Hello guys, In this blog I am going to provide most frequently asked selenium-related interview questions and answers in part-wise.


Part 1


1. How to handle dynamic elements in Selenium?

Solution – We can use x-path along with contains(), starts-with(), ends-with() methods –   
                    depends on the scenario.     

Example

Let’s say, ‘Id’ of a username field is – username_123
If you open the page again, then Id is showing as - username_245

That’s mean, the first part – username is static, whereas, second part after underscore is dynamic.

x-path for such scenario will be =  //*[contains(@id ,’username’)]

Since the starting text is static, the above scenario can also be handled using starts-with() method.

x-path = //*[starts-with(@id ,’username_’)]


Let’s say, ‘Id’ of a username field is – 123_username
If you open the page again, then Id is showing as – 245_username

Here the latter part is static.

X-path = //*[ends-with(@id ,’_username’)]


2.  Give an example of Method overloading in Selenium.

Solution -  Example can be switching to Frames.

·         frame(int index)
·         frame(string frame_name)
·          frame(WebElement element)


1   3.  How do you achieve synchronization in Selenium?
S
S   Solution – driver.manage().timeOuts().implicitlyWait(10, OutputType.SECONDS);
It 
il      It will ask the web driver to wait for 10 seconds before throwing an exception in case any web driver is unable to locate any element. It is applicable to every command written in the script.


1
   4. How to invoke an application in web driver?

S   Solution –

·         driver.get(“application_url”);

·         driver.navigate().To(“application_url”);


1  5. How to get the width and height of the textbox?
     Solution –

·         driver.findElement(By.xpath(“locator”)).getSize().getWidth();
·         driver.findElement(By.xpath(“locator”)).getSize().getHeigtht();


    6. Difference between Assert, Verify and WaitFor commands.
S
o   Solution –

·         Assert – It checks whether an element is on the page or not. If the element is not present, then the test will fail, and execution will stop at that point only.
·         Verify - It checks whether an element is on the page or not. If the element is not present, then the test will fail, but execution will continue until the last command of the script.
·         WaitFor – It waits for the specified amount of time so that the element may be available on the page. But if the element is not available within the specified amount of time, then the test will fail at that point only.


7.  Different ways to refresh the browser.

S     Solution –

·         Driver.navigate().refresh();
·         Driver.navigate().to(driver.getCurrentUrl());
·         Driver.get(driver.getCurrentUrl());


1  8. Different exceptions encountered in Selenium WebDriver.
S
S    Solution -  Below are some most encountered Exceptions that occur while creating Selenium Automation Script.

  •     NoSuchFrameException
  •     AlertNotPresentException. 
  •     NoSuchElementException.
  •     ElementNotVisibleException.
  •      NOSuchWindowException.
  •       TimeOutException.
         
         To get a detailed explanation, follow the linkExceptions In Selenium


    9. What is the alternate way to click on the Login button?

S   Solution –

                    submit() – But can be used only when attribute ‘type=submit’.

1
    10. What is the purpose of getOptions() methods?
S    
o      Solution – It is used to get all the selected options from the dropdown list.

                             Return Type -  List<WebElement>

       
      Below program will print all the options of the Country drop-down


 package com.javascript;  
   
 import java.util.List;  
   
 import org.openqa.selenium.By;  
 import org.openqa.selenium.WebDriver;  
 import org.openqa.selenium.WebElement;  
 import org.openqa.selenium.chrome.ChromeDriver;  
 import org.openqa.selenium.support.ui.Select;  
   
 public class GetOption {  
   
      public static void main(String[] args) {  
             
           System.setProperty("webdriver.chrome.driver", "F:\\software\\chromedriver_win32\\chromedriver.exe");   
            WebDriver driver = new ChromeDriver();   
            driver.get("http://newtours.demoaut.com/mercuryregister.php");   
            driver.manage().window().maximize();  
              
            Select select = new Select(driver.findElement(By.xpath("//select[@name='country']")));  
            List<WebElement> options = select.getOptions();  
            for(WebElement option : options)  
            {  
                 System.out.println(option.getText());  
            }  
              
   
      }  
   
 }  
   

Thursday, November 29, 2018

Actions in Selenium | Keywords And Mouse Events Using Actions Class In Selenium WebDriver

In this tutorial, I am going to cover how to handle keyboard and mouse events using Actions classes in Selenium.


Topics to be covered
  • What is Keyboard and Mouse events?
  • Actions class in Selenium.
  • How to handle different keyboard and mouse events using Actions class in Selenium?


Actions 


There are various kinds of Keyboard and Mouse events such as - 
  • Drag and drop.
  • Right click.
  • Double click.
  • MouseOver.
and so on.

Such events are handled using advanced user interactions APIs. It contains Action and Actions classes to handle such events.

In Selenium, we will use Actions class to perform such events while automating.

In order to use Actions class, we need to import one package

 org.openqa.selenium.interactions.Actions;  


We will use the Mercury Tours application to demonstrate keyboard and mouse events.


#1 MouseOver - In this event, only the mouse is moved over a web-element but not clicked.

To handle MouseOver, Actions class provides a method

  • movetoElement(WebElement element); -> element indicates on which element MouseOver will be performed.
Note - moveToElement() will just inform that on which element mouseOver will be done. It will not move the mouse over that element.

To achieve it, Actions provides two methods- 
  • perform() - It completes an action which is intended to achieve. It is used when the user wants to perform a single action.
  • build() - If the user wants to perform multiple actions on an element at a time, it is used. It compiles all the actions as a single one. It is followed by perform() methods.

-> These two methods are applicable to all the events mentioned above. 

-> We will get a clear picture when we do programming.


 package com.sessions;  
   
 import org.openqa.selenium.By;  
 import org.openqa.selenium.WebDriver;  
 import org.openqa.selenium.WebElement;  
 import org.openqa.selenium.chrome.ChromeDriver;  
 import org.openqa.selenium.interactions.Actions;  
   
 public class keyboard_Mouse_Events {  
   
      public static void main(String[] args) {  
           System.setProperty("webdriver.chrome.driver", "F:\\software\\chromedriver_win32\\chromedriver.exe");  
             
           WebDriver driver = new ChromeDriver();  
             
           driver.get("http://newtours.demoaut.com/");  
             
           driver.manage().window().maximize();//maximizing browser.  
             
           //Creating Actions Class Object  
           Actions act = new Actions(driver);  
             
           //Locating the element to perform mouse over.  
           WebElement element = driver.findElement(By.xpath("//input[@name='login']"));  
             
           //Performing mouse over on the element.  
           act.moveToElement(element).perform();  
             
           }  
   
 }  


Explanation - 
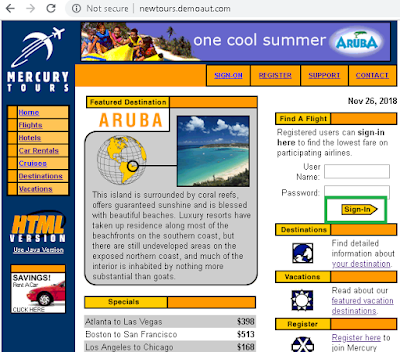
  • In this program, We are performing mouse over on the 'Login' button of Mercury Tours application highlighted in the above image.
  • 'element' variable is pointing to the 'Login' button.
  • We have used perform() method as we are performing only single action.
  • Since it is just doing mouse over operation on the 'Login' button. So we can't visualize it.


#2 Right Click - This event performs a right-click operation as we normally do with the mouse.

->Actions class provides two methods to achieve it - 

  • contextClick(WebElement element); --> element indicates on which element Right-Click will be performed.
  • contextClick(); --> To perform right-click operation on the web-page.


 package com.sessions;  
   
 import org.openqa.selenium.By;  
 import org.openqa.selenium.WebDriver;  
 import org.openqa.selenium.WebElement;  
 import org.openqa.selenium.chrome.ChromeDriver;  
 import org.openqa.selenium.interactions.Actions;  
   
 public class keyboard_Mouse_Events {  
   
      public static void main(String[] args) {  
           System.setProperty("webdriver.chrome.driver", "F:\\software\\chromedriver_win32\\chromedriver.exe");  
             
           WebDriver driver = new ChromeDriver();  
             
           driver.get("http://newtours.demoaut.com/");  
             
           driver.manage().window().maximize();//maximizing browser.  
             
           //Creating Actions Class Object  
           Actions act = new Actions(driver);  
             
           //Locating the element to perform right-click.  
           WebElement element = driver.findElement(By.xpath("//input[@name='login']"));  
             
           //Performing right-click action on the element.  
           act.contextClick(element).perform();  
             
             
           }  
   
 }  


Explanation - 
  • In this program, We are performing right-click on the 'Login' button of Mercury Tours application highlighted in the above image.
  • 'element' variable is pointing to the 'Login' button.
  • We have used perform() method as we are performing only single action.


#3 Double Click - This event performs a double-click operation as we normally do with the mouse.

->Actions class provides two methods to achieve it - 

  • doubleClick(WebElement element); --> element indicates on which element double-Click will be performed.
  • doubleClick(); --> To perform double-click operation on the web-page.

 package com.sessions;  
   
 import org.openqa.selenium.By;  
 import org.openqa.selenium.WebDriver;  
 import org.openqa.selenium.WebElement;  
 import org.openqa.selenium.chrome.ChromeDriver;  
 import org.openqa.selenium.interactions.Actions;  
   
 public class keyboard_Mouse_Events {  
   
      public static void main(String[] args) {  
           System.setProperty("webdriver.chrome.driver", "F:\\software\\chromedriver_win32\\chromedriver.exe");  
             
           WebDriver driver = new ChromeDriver();  
             
           driver.get("http://newtours.demoaut.com/");  
             
           driver.manage().window().maximize();//maximizing browser.  
             
           //Creating Actions Class Object  
           Actions act = new Actions(driver);  
             
           //Locating the element to perform double-click.  
           WebElement element = driver.findElement(By.xpath("//font[text()='Password:']"));  
             
           //Performing double-click action on the element.  
           act.doubleClick(element).perform();  
             
             
           }  
   
 }  


Explanation - 
  • In this program, We are performing double-click on the 'Password' text of Mercury Tours application highlighted in the above image.
  • 'element' variable is pointing to the 'Password' text.
  • We have used perform() method as we are performing only single action.
  • After performing the action, 'Password' text will be highlighted in blue.


#4 Drag And Drop - This event drags one element from the source location and drops it to the target location.

->Actions class provides two ways to achieve it -

  1. clickAndHold(source_element).moveToElement(target_element).release().build().perform();
  2. dragAndDrop(source_element,target_element);

First Approach - 

 package com.sessions;  
   
 import org.openqa.selenium.By;  
 import org.openqa.selenium.WebDriver;  
 import org.openqa.selenium.WebElement;  
 import org.openqa.selenium.chrome.ChromeDriver;  
 import org.openqa.selenium.interactions.Actions;  
 import org.openqa.selenium.support.ui.ExpectedConditions;  
 import org.openqa.selenium.support.ui.WebDriverWait;  
   
 public class keyboard_Mouse_Events {  
   
      public static void main(String[] args) {  
           System.setProperty("webdriver.chrome.driver", "F:\\software\\chromedriver_win32\\chromedriver.exe");  
             
           WebDriver driver = new ChromeDriver();  
             
           driver.get("https://jqueryui.com/droppable/");  
             
           driver.manage().window().maximize();//maximizing browser.  
             
           //Creating Actions Class Object  
           Actions act = new Actions(driver);  
             
           //Waiting for the frame to be available and switching to it.  
           WebDriverWait wait = new WebDriverWait(driver,10);  
           WebElement frame= driver.findElement(By.xpath("//iframe[@class='demo-frame']"));  
           wait.until(ExpectedConditions.frameToBeAvailableAndSwitchToIt(frame));  
             
           //Locating the element to drag.  
           WebElement drag_element = driver.findElement(By.xpath("//div[@id='draggable']"));  
             
           //Locating the element to drag.  
           WebElement drop_element = driver.findElement(By.xpath("//div[@id='droppable']"));  
             
           //Performing drag and drop  
           act.clickAndHold(drag_element).moveToElement(drop_element).release().build().perform();  
             
           }  
   
 }  


Explanation - 
  • In this program, We are performing drag and drop operation as shown in the above image.
  • These drag and drop elements are available under a frame. So we first switched to the frame by locating it. We waited for the frame to be available then switched to it.
  • 'drag_element' variable is pointing to the element to be draggable.
  • 'drop_element' variable is pointing to the element to be droppable.
  • We have used build().perform() method as we are performing three operations.
  • clickAndHold() -> It will click on the source element and hold it.
  • moveToElement() -> It will move the hold element to the specified target element.
  • release() -> It will release the hold element to the target element.


Second Approach  -

 package com.sessions;  
   
 import org.openqa.selenium.By;  
 import org.openqa.selenium.WebDriver;  
 import org.openqa.selenium.WebElement;  
 import org.openqa.selenium.chrome.ChromeDriver;  
 import org.openqa.selenium.interactions.Actions;  
 import org.openqa.selenium.support.ui.ExpectedConditions;  
 import org.openqa.selenium.support.ui.WebDriverWait;  
   
 public class keyboard_Mouse_Events {  
   
      public static void main(String[] args) {  
           System.setProperty("webdriver.chrome.driver", "F:\\software\\chromedriver_win32\\chromedriver.exe");  
             
           WebDriver driver = new ChromeDriver();  
             
           driver.get("https://jqueryui.com/droppable/");  
             
           driver.manage().window().maximize();//maximizing browser.  
             
           //Creating Actions Class Object  
           Actions act = new Actions(driver);  
             
           //Waiting for the frame to be available and switching to it.  
           WebDriverWait wait = new WebDriverWait(driver,10);  
           WebElement frame= driver.findElement(By.xpath("//iframe[@class='demo-frame']"));  
           wait.until(ExpectedConditions.frameToBeAvailableAndSwitchToIt(frame));  
             
           //Locating the element to drag.  
           WebElement drag_element = driver.findElement(By.xpath("//div[@id='draggable']"));  
             
           //Locating the element to drag.  
           WebElement drop_element = driver.findElement(By.xpath("//div[@id='droppable']"));  
             
           //Performing drag and drop  
           act.dragAndDrop(drag_element, drop_element).build().perform();  
             
           }  
   
 }  


Explanation -

  • dragAndDrop(source, target) -> It will drag the specified source element and drop it to the specified target element.